

Level 87, ilvl 515
88
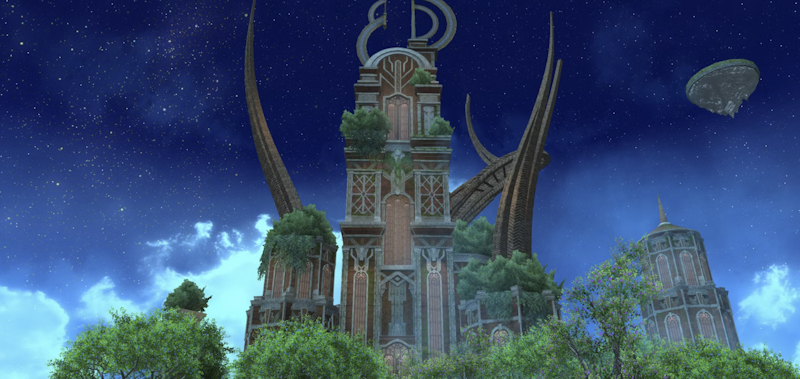
Elpis (X:13.2, Y:6.1, Z:4.9)
 Caging the Messenger
The most extensive facility in Elpis, Ktisis Hyperboreia is a sprawling complex of magically simulated environs. Concepts awaiting evaluation are brought here for the last stages of observation, and, upon meeting the appropriate criteria, are finally released into the world at large. Determined not to surrender Meteion, it is within this facility that Hermes has taken refuge, and you and your companions must find and confront him if you are to shed light upon the truth of the Final Days.
Skull Dasher is a tank buster, while Frigid Stomp is a room-wide AOE. Frostbite and Seek involves the boss returning to the center of the arena, creating a snowstorm, and then disappearing. After a short time, the boss will emerge from one of the six craters around the arena and unleash a massive AOE attack that can only be avoided by standing behind the boss. Players can determine which crater the boss will emerge from by looking for the one with no tracks leading away from it. If hit by this attack, players will suffer heavy damage and a Vulnerability Up debuff. Icicall spawns three icicles that fire point-blank AOEs. They will then either fire a straight line AOE across the edges of the arena or directly through the center. Heavy Smash randomly targets a player with a stack marker, requiring players to stack together to reduce damage. This can happen during Icicall and will resolve after the icicles have fired, so it is best to stack after the arena is clear.
In the encounter, the boss has several abilities. "Scratch" is a tank buster attack, while "Intimidation" is an area-of-effect attack that affects the entire room. "Pyric Blast" is a stack marker that players need to be aware of. During the fight, the boss will inhale Aether, causing one or two of its heads to grow larger and emit flames from its mouths. This indicates that those heads will perform "Pyric Breath." When the boss leaps to the center of the room and starts casting "Pyric Breath," the swollen heads will unleash a 120-degree fire attack that covers a third of the room. Players should stand in the safe zones indicated by the normal heads. However, if the "side" heads are active, standing in front of the boss will actually be safe. Additionally, the boss will summon four "Pyric Spheres" around the arena, which will fire cross-line attacks. Players must position themselves in the spaces between the spheres to avoid taking damage.
After the boss's initial Trismegistos attack, the arena will be engulfed in an area-of-effect (AoE) that applies a debuff called Windburn, causing damage over time for 15 seconds. Trismegistos is a room-wide AoE attack. The Double ability amplifies the next spell cast, while Quadruple enhances the next two spells. True Tornado is a tank buster move that, when combined with Double, releases a circular AoE beneath the tank, which should be avoided. True Bravery is an interruptible ability that grants the boss a Damage Up buff lasting 20 seconds. True Aero marks each player with unavoidable AoE lines that must be spread out to prevent hitting others. If the boss uses Double before this, additional line AoEs will appear after the initial lines, which players can easily step out of. True Aero II marks players with close-range AoEs that need to be spread out from to avoid overlapping damage. If Quadruple is used before this, an additional AoE will spawn after the initial ones, which players must also step out of. Meteor involves four markers around the arena's edges, and players should run to the center to minimize damage from the descending meteors. These meteors will block the damage from Hermetica. Hermetica summons large green panels at the arena's edges, which will later unleash a massive line AoE across the platform, knocking back anyone hit. Hermetica appears in four different patterns. The first pattern includes three sets of panels that spawn at the edges, avoiding the center of the arena. The best approach is to stand in the center of the room to avoid damage. The second pattern has two panels on each side that fire through the arena's center. The third pattern (Double) consists of two sets of four panels. Players must break line of sight in the order they were summoned by standing behind a meteor without yellow cracks, as these meteors shatter after the first attack. The fourth pattern (Quadruple) involves four sets of two panels on each edge of the arena. Players must stand in the center and dodge towards the opening next to each set of panels to avoid the blasts. These mechanics repeat until the boss is defeated. For the Quadruple panels attack, imagine the arena divided into four quadrants by an imaginary cross. Each pair of panels will fire shots that hit different sections: left half, right half, upper half, and lower half (not necessarily in that order). The position of the first shot is random, but subsequent shots follow a predictable pattern. For example, if the first shot covers the left half and the second shot covers the lower half, the safe quadrant will be the upper right quadrant. It's beneficial to stay close to the center of the arena. Let the first two shots be fired before moving to the opposite quadrant for the next two shots. There is a sufficient delay between each shot to allow for the necessary movement.